Saturday, May 30, 2009

A Twist on Pad Thai


Fresh mint, chives, and cilantro totally make these noodles!

The inspiration for my most recent noodle dish comes from the popular Pad Thai dish. Pad Thai is a great first introduction to Thai cuisine for those afraid of the heat from thai chilis. Usually a combination of rice noodles, lime juice, fish sauce, garlic, a little chili pepper, cilantro, peanuts, and shrimp or pork.

My recipe took a liberal interpretation of pad thai, using a stronger peanut flavored sauce that I had in the cabinet, adding in peanut butter, lime juice, garlic, and chili paste. In substitution of shrimp and pork, I sauteeed a bunch of carrots, squash, and mushrooms. I also used whole wheat spaghetti because that's what I had in my cabinet. The addition of fresh cilantro, mint, and chives at the end really made this dish. The bright herbs mellowed out the rich peanut sauce. I also made this noodle dish a lot spicier than a traditional pad thai. You can use less paste if you desire less heat.


Peanut noodles with veggies and fresh herbs.

Recipe for Spicy Peanut Noodles with Vegetables and Herbs

2 large or 4 small carrots, julienned
2 small yellow squash, julienned
2 cups mushrooms, sliced
1/2 lb whole wheat spaghetti (or rice noodles)
1/4 c peanut sauce (I used 365 Organic Peanut Sauce)
3 tbsp peanut butter (chunky or smooth)
2 tbsp chili paste (I would recommend using 1 tbsp for less heat or you can omit)
1 lime, juiced
2 cloves garlic, minced
1 handful cilantro, chopped
6 sprigs mint, chopped
6 stalks of chives, chopped
1/4 c peanuts, chopped

Heat two tablespoons oil in a large saucepan. Sautee carrots for 3 minutes. Add mushrooms and squash and sautee 3-5 more minutes. While vegetables are cooking, bring a pot of salted water to a boil and add noodles, cook for 8 minutes. Add in peanut sauce, peanut butter, garlic and chili paste. Stir peanut butter mixture together until well mixed. Add lime juice. Toss vegetables in sauce. When noodles have cooked, al dente, remove from water. Drain and add to vegetable mixture. Toss well and top with herbs and peanuts.


Tuesday, May 26, 2009

Organic Cupcakes?!


Banana cupcake with cream cheese frosting.

AJ and I have talked about turning my love of baking into a career. If I were going to open a bakery it would be a cupcake bakery. But my cupcake bakery would differ in that I would try whenever possible to use organic and locally sourced ingredients. What a brilliant idea. Too bad someone has already thought of this and turned it into a reality. It's not all bad news though, I still get to eat these cupcakes.

Kara's Cupcakes all started with Kara Lind, the executive pastry chef. A former ad sales executive turned her love of home baking into a career with a small cupcake catering business. The high demand led to the opening of her first store in San Francisco. Four other stores opened up in the Bay Area shortly thereafter. We headed to her Palo Alto location.


Kara's premium, fresh, local ingredients are translated into unique flavors such as fleur de sel and raspberry dazzle. I always have a hard time choosing a flavor. I usually would like to try them all. On this particular occasion I was in the mood for something light (as light as a cupcake can be). The banana cupcake with cream cheese icing seemed like the perfect fit. Moist and fluffy with excellent banana flavor, this cupcake was a winner. The cream cheese frosting was creamy, tangy, with the perfect touch of sweetness.

AJ chose the fleur de sel and the vanilla chocolate. The fleur de sel, certainly piqued my interest. The popularity of the fleur de sel caramel has been sweeping the nation, and so it seems natural that Kara's cupcakes would create a cupcake in its honor. Fleur de sel is a sea salt that is scraped off the top layer of salt before it sinks to the bottom of the salt pans. It is rare and thus rather expensive. A dark chocolate cake is filled with a creamy, thin caramel filling. Topped with chocolate ganache and fleur de sel, this cupcake is the epitome of decadence. The caramel, chocolate, and fleur de sel work very well together. If you're in the indulgent mood, this one is for you.


Pretty pink boxes to house these lovely cupcakes.

The vanilla chocolate is a nice yellow cake topped with chocolate frosting. This classic pairing was done very well. The chocolate frosting had excellent cocoa flavor and wasn't too sweet.

If I were to compare these to some other cupcakes I have had recently, I would say they are smaller in size, but cost the same as larger cupcakes sold at places like Sprinkles and Icing on the Cake. If you've ever been to Georgetown cupcake, these cupcakes bear a similar resemblance, in size and in appearance. I enjoyed these cupcakes, and especially their mission of using local and organic ingredients. However, the cake wasn't as fluffy as some cupcakes I have eaten at Sprinkles and Icing on the Cake.

Bottom Line: If you are all about supporting local/organic farmers, and love cupca kes, head on over to Kara's cupcakes.

Saturday, May 23, 2009

Lime and Cilantro Potatoes with Zucchini


Zucchini and potatoes are abundant at the farmer's market. I remembered seeing a recipe with both in "Fresh Indian" by Sunil Vijakar. I am always trying to expand my entree repertoire, and thought this would be a great opportunity to try out a new Indian dish. 

I really enjoy this recipe, because it highlights simple produce, adding in tons of spices and herbs. Not only does this enhance the flavor of the dish, but spices and herbs are practically calorie-free.

Cumin, garam masala, and cilantro are popular flavors in Indian cooking, and some of my favorites in my own cooking. Some of you might be wondering what spices make up garam masala? It is usually a combination of cardamom, cloves, cumin, peppercorns, cinnamon, and nutmeg. That gives you an idea of what it will taste like. A little bit goes a long way. You can make your own, or just buy some. I got mine at the Indian grocery store nearby. But most supermarkets and Asian markets will have it as well. 

This dish is fresh and bright and a great way to get in some extra vegetables. Plus, who doesn't like potatoes and zucchini?


Lime and Cilantro Potatoes with Zucchini

1 tbsp olive oil
1 small onion, finely diced
2 tsp cumin seeds
2 garlic cloves, crushed
1 tsp freshly grated ginger root
1/2 tsp tumeric (I left it out)
1 1/4 lbs potatoes, cut into matchsticks and boiled until soft
1/2 c hot water
1 zucchini, cut into thick matchsticks and boiled
2 plum tomatoes, finely hcopped
1/2 tsp garam masala
1/4 c chopped fresh cilantro
juice and zest of one lime
salt to taste

Heat oil in pan and add onion. Stir-fry over medium heat for 5-6 min. Add cumin seeds, garlic, ginger, and tumeric. Stir-fry for 2-3 minutes and then add potatoes and water. Cook over high heat for 3-4 minutes, then stir in zucchini, tomatoes, and garam masala. Stir and cook on high for 3-4 minutes, remove from heat, and stir in chopped herbs and lime zest and juice. Season well and serve immediately. 

Cherry Jam


Cherry Jam on my favorite 'Woodstock' bread.

Cherries are in season in California! It is very exciting how early fruit and produce come in season in California. In Virginia, we have to wait until June and July to see our favorite fruits and vegetables.

Besides eating these delicious cherries on their own, I decided to make some jam. I used a quick recipe I found on David Lebovitz's blog.

If you don't have this many cherries, you can cut the recipe down, and it will still turn out great. The jam was slightly tart, with the perfect amount of sweetness. I prefer my jams to showcase the fruit, and this recipe certainly does. By leaving some of the cherry halves intact, you get a nice bits of fruit in the jam. Yum!


AJ could just eat this jam by itself!

So what is one to do with all this jam? It would make a lovely filling for a cake, and could be used for a delicious sauce for pork. But my favorite way to enjoy jam - is a nice PB & J! I never seem to tire of these sandwiches. AJ and I buy this delicious bread at our farmer's market from the Harvest Bread Company. They make a delicous whole wheat bread with poppy seeds and pine nuts. Topped with cashew butter and homemade cherry jam - the combination is unbelievable!


So go on and indulge your inner child!

Tuesday, May 19, 2009

Pancetta Mac and Cheese


Pancetta Mac 'n Cheese

There is something so comforting about warm, gooey cheese and pasta. I had a hankering for some mac n' cheese last week, and decided to whip up a batch. The idea of cheese and pasta is so simple, yet so delicious. What could possibly make it any better? How about some crispy pancetta?


Grating up some extra sharp and jalapeno cheddars.

But wait, haven't you been trying to eat less meat. Yes, I have. But, sometimes the appeal of crispy pork is just too good to turn down. I found this recipe for pancetta mac n' cheese in Bon Appetite magazine.


Frying up some pancetta.

I halved the recipe, and used two different kinds of cheddars (from Bravo Farms) we picked up from our farmer's market. These cheddars were hormone-free and locally sourced. If you're going to eat cheese, I think that is the best way to do it. The extra cost is worth it. The extra sharp cheddar was pungent, while the jalapeno added a slight kick. I thought these would pair well with the smoky pancetta.


Measuring out the milk for the cheese sauce.

AJ helped grate the cheese, while I fried up the pancetta. While that was in the works, I boiled some whole-wheat rotini. The spirals allow for maximum cheese coating! Once the pancetta crisps up, I made a roux in the pan. The roux is what will make your sauce thick. Then you add the milk. When the milk-pancetta mixture has reduced some, you remove it from the heat and stir in the cheese. The pasta is stirred into the sauce and then poured into a casserole dish. Bake it in the oven for about 30 minutes, and dinner is ready.


Mixed greens salad with pancetta mac n' cheese.

The macaroni and cheese was wonderful. Once you have made your own, you will never go back to eating kraft from a box. The cheeses were strong, and paired well with the smoky pancetta. The pasta dish pairs well with a light mixed greens salad. Warm and gooey, this dish comforts the stomach and the soul.

Friday, May 15, 2009

Falafel's Drive-In


Falafel Drive-In

It's amazing how tastes mature with age. While I have always loved chickpeas and hummus, I hated falafel. It took a trip to Basil in Charlottesville, VA to change my mind. Now, I totally dig falafel. One of my friends told me about a great falafel place in San Jose that was featured on Diners, Drive-ins, and Dives.

Falafel's Drive-In has been around since 1966, when the Nijmeh family moved to San Jose. They started out serving burgers, and then added their family recipe falafel to the menu. Customers have been raving about the falafel ever since.


AJ is stretching out his torso to prepare for lots of falafel.

The open-air seating was packed when we arrived on a late Sunday afternoon. As newbies we were a little thrown off by the two different lines that were forming. There is one to pick up your order and one to place your order. Don't forget to bring cash, they don't accept credit card!

The menu offers hamburgers and corn dogs, but the real treat is the falafel and other mediterranean fare. AJ ordered the special - a large falafel with a banana shake (no other flavors can be substituted for the special). The owner encouraged us to go with the banana, because it is the best flavor. I ordered a small falafel and then we sat down to wait for our number to be called.


Big bites!

The sandwiches came out quickly. The falafel comes in a pita pocket with cucumber, tomato, lettuce, hot sauce, and tahini sauce. This fast food version of falafel was real tasty! The falafel are fried to a nice brown with wonderful cilantro and garlic notes. These crisp balls stand up well to the huge quantities of sauces poured on top. I can't say the same for the pita bread, which began to disintegrate halfway through. While extremely messy, I thoroughly enjoyed the hot sauce - which seemed almost like a combination of sriracha and ketchup. While I'm not sure this is the best falafel I've ever had, I would certainly return.


These are extremely messy, but totally worth it.

The cold and creamy shake was a perfect compliment to the spicy falafel. AJ and I both agreed that the banana flavor was light and refreshing. Sometimes banana flavored things can taste so artificial, but this shake was the real deal.


Banana milkshakes are their most popular flavor.

Bottom Line: For a nostalgic drive-in experience and some darn good falafel, head on down to Falafel's Drive-In.

2301 Steven's Creek Blvd
San Jose, CA

Wednesday, May 13, 2009

Nopales (Cactus) Tacos


Nopales and sweet potato tacos with avocado and salsa.

When I head to my local farmer's market, I often try and find one item that I have never tried before. A couple of weeks ago I spotted nopales, aka prickly pear cactus. A common staple in Mexican cuisine, I had always wanted to try it. Our farmer told us that these cactus had already been removed of their spines, and were ready to eat. Apparently raw nopales are an excellent addition to salads.

I wasn't sure how I was going to use my cactus, until I saw Kim O'Donnel's recipe for sweet potato tacos. Surely cactus would be a great addition to any taco. Alright, I know what you're thinking - sweet potatos and cactus? How could those exotic flavors pair well together. Truth be told, I wasn't sure either, but I am all about trying new things.


These tacos are great topped with some fresh salsa.

I tweaked the recipe slightly, mashing up my sweet potatoes with some salt and a little garlic. I spread the sweet potato mash on corn tortillas, topped them with sauteed nopales, avocado, and fresh salsa. These tacos were packed with flavor. The nopales were amazingly tangy, almost like eating a fleshy lime. The smooth, almost creamy texture of the nopales worked well with the sweet potatoes. I made my own salsa with tomatoes, onions, jalapeno, cilantro, and garlic. The freshness and brightness of these tacos is just wonderful.


AJ loves nopales tacos!


Going in for the kill!

Fresh Salsa
1 large tomato, diced
1/2 onion, diced
2 cloves garlic, minced
1/4-1/2 cup cilantro, chopped
1/2 jalapeno, diced
salt and pepper to taste

Mix ingredients in a bowl. For a more pureed version, blend in food processor.

Tuesday, May 12, 2009

Sprinkles Cupcakes - Palo Alto, CA


Chai and Strawberry Cupcake

AJ and I took a trip over to Sprinkles to try out the famed West Coast cupcakes, which may have started the whole cupcake craze. The story behind Sprinkles is pretty interesting. The husband/wife team left their jobs as investment bankers to make cupcakes! Apparently they work more hours now than when they were working in banking. You can read more about their story on their website.

Suffice to say, their hard work pays off, the cupcakes at Sprinkles are moist and fluffy, with the perfect amount of frosting. They offer a plethora of flavors, which allowed us to indulge our sweet tooths by getting four cupcakes, instead of two. I mean we had to try a couple different flavors, right? Plus their chai cupcake is only on the menu once a week - what luck! Don't worry we spaced out our consumption.


Chai Cupcake with Cinnamon Cream Cheese Frosting.

After a couple minutes of scanning the long menu, we decided on the pumpkin, strawberry, chai, and chocolate marshallow. Each cupcake comes with a decorative sugar button on top. The colors distinguish one cupcake from the next. While cute, these buttons were not tasty.

After discarding the button, a bite into the chocolate marshmallow revealed an intense dark chocolate frosting - with a slightly bitter taste. Fans of dark chocolate will be pleased in that the ganache isn't cloying. The chocolate cake was moist and filled with a marshmallow creme. While enjoyable, this homage to the hostess cupcake wasn't my favorite. Again, diehard chocolate fans will be pleased.

The strawberry and chai cupcakes were similar in that they were extremely light. The flavors were somewhat muted. I enjoyed the strawberry cupcake, but would have liked a more intense strawberry flavor to the cake. Again the chai spices were toned down in the cake.

The hands-down favorite was the pumpkin cupcake with cinnamon cream cheese icing. The cupcake was bursting with pumpkin, like cinderella's carriage after midnight. The cream cheese frosting had the perfect balance of sweetness and slight tanginess.

Bottom Line: At 3.25 these cupcakes are rather large, but the cake is so light, you won't feel bad eating another. And trust me, you won't be able to eat just one.

Sprinkles
393 Stanford Shopping Center
Palo Alto, CA

Vegetable Thai Red Curry


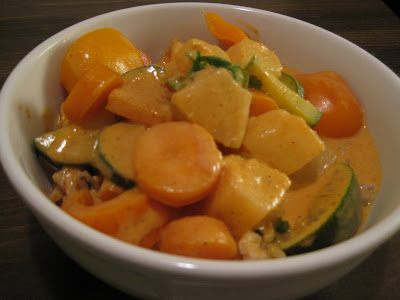
Red Curry with carrots, zucchini, bell pepper, and pineapple.

When I dine out at Thai restaurants, I am always tempted by the curry dishes. With its spicy thai chilis and sweet, fragrant coconut milk, curry offers complex, yet comforting flavors. In an attempt to broaden my dinner choices in college, I bought at thai recipe book. Since that acquisition thai red curry with pineapple has been one of my favorites to prepare. My go-to add-ins were shrimp, bell pepper, and pineapple. This time around I made it vegetarian.

The recipe is really simple, especially if you buy a pre-made chili paste. I have made my own in the past, which provides some amazingly fresh flavor. But the premade stuff is pretty good too. There are a couple items that you might not have on hand, like fish sauce, but trust me its worth purchasing. Fish sauce is a staple of thai cooking, so you will use it again and again. Read the recipe and figure out what items you will need to purchase before turning on your stovetop.


Simmering the red curry. Garnish with cilantro.

Thai Red Curry
Adapted from "Quick & Easy Thai: 70 Everyday Recipes" by Nanci McDermott

1 1/2 c unsweetened coconut milk
2 tbsp red curry paste (or more for super hot curry)
1/2 c water
2 tbsp fish sauce
1 tbsp sugar
1 cup drained canned pineapple chunks or bite size fresh pineapple
6 wild lime leaves (optional; I added the juice of 1 lime)
2 zucchini (sliced into half moons)
1 orange bell pepper (cut into bite size pieces)
2 carrots (sliced)
1/3 cup cilantro

In medium skillet or saucepan, heat 1/2 cup coconut milk over medium-hihg heat, stirring often, until thickened and gragrant, two to three minutes. Add red curry paste and cook a minute or two, pressing and stirring to dissolve it. Stir in remaining 1 cup coconut milk, the water, fish sauce, sugar, vegetables, and lime leaves (or juice). cook over medium heat until vegetables soften, 4-5 minutes. Add the pineapple and cook for another 2-3 minutes. Sprinkle with fresh cilantro. Serve over rice.


Monday, May 11, 2009

"They're Magically Delicious!"


General Mills Variety Pack: Lucky Charms, Trix, Golden Grahams, Cheerios, Honey-nut Cheerios, Frosted Cheerios, Cocoa Puffs, Cinnamon Toast Crunch

I don't know about you, but I love cereal. I loved it as a kid, eating a big bowl on a Saturday morning while watching cartoons. I loved it in college - I practically lived off the stuff when my food budget was low. In the past couple of years I have been eating less cereal. I don't know exactly how it began, but it may have involved the transportation issues of bringing milk and cereal into the office. I also found it difficult to finish a half gallon of milk by myself before it spoiled.

This morning, however, I was just craving some cereal. I wasn't sure exactly what I wanted, but I wanted something nostalgic. Perhaps Lucky Charms, with their deliciously crunchy marshmallows? Or maybe some Cinnamon Toast Crunch, that sugar-cinnamon milk left in the bowl is reason enough. Decisions, decisions. I ended up going home with the General Mills Variety pack!

The variety pack was a thing of beauty - 8 different kinds of cereal to choose from! Due to the exhorbitant pricing, my mom would rarely allow us to indulge in the variety pack. Her decision may also have been influenced by the high sugar content, and the battle among her children for the coveted box of Lucky Charms. Well now that I'm on my own, I can buy what I want.

I selected the Golden Grahams this morning, adding in some sliced bananas (now it's a balanced breakfast!) AJ went for the combo of frosted and honey-nut cheerios. Mm sugary goodness.

So tell me, how do you feel about cereal? What's your favorite kind?

Sunday, May 10, 2009

Oreo Cupcakes


Oreo Cupcakes

A couple weeks ago I had been baking up a storm. I made these delightful oreo cupcakes to bring along with me when I searched for jobs at bakeries. At least one baker seemed to appreciate my efforts. I first made these cupcakes for my friend Jenny's birthday, because she is a huge oreo fan. AJ loves oreos as well, so I made these with another oreo lover in mind.

I place an oreo at the bottom of each cupcake liner, in addition to adding oreos to the batter. To top it all off, I decorate these with half an oreo. There is no dearth of oreo in this recipe! The oreo at the bottom softens up, which makes these cupcakes easy to eat.

Recipe is as follows.

Oreo Cupcakes

2-¼ cups all-purpose flour
1 tablespoon baking powder
½ teaspoon salt
1-2/3 cups sugar
1 cup milk
½ cup (1 stick) butter, softened
2 teaspoons vanilla
3 egg whites
1 cup crushed chocolate sandwich cookies (about 10 cookies) plus additional for garnish
1 recipe buttercream frosting

Preparation:
1. Preheat oven to 350°F. Lightly grease 24 standard (2-1/2-inch) muffin pan cups or line with paper baking cups.
2. Sift flour, baking powder and salt together in large bowl. Stir in sugar. Add milk, butter and vanilla; beat with electric mixer at low speed 30 seconds. Beat at medium speed 2 minutes. Add egg whites; beat 2 minutes. Stir in 1 cup crushed cookies.
3. Place one oreo cookie in each muffin cup. Spoon batter evenly into prepared muffin cups, filling two-thirds full. Bake 20 to 25 minutes or until toothpick inserted into centers comes out clean.
Cool in pans on wire racks 10 minutes. Remove cupcakes to racks; cool completely.
4. Frost cupcakes; garnish with additional crushed cookies.

Buttercream Frosting
1/2 c. (1 sticks) butter (softened)
3 1/2 c. confectioner's sugar
1 tsp vanilla
2-3 tsp milk

Beat butter until light and fluffy. Beat in sugar. Add vanilla and milk to thin to the proper consistency.


Wednesday, May 6, 2009

Salmon in a Cilantro Lime Sauce


Salmon, wild rice, and steamed asparagus.

I have been eating less meat recently, but that doesn't mean I don't have a craving for it every now and then. Recently I had been lusting after the beautiful rose colored flesh of the wild pacific salmon. While walking through the farmer's market, I stumbled upon a fish monger selling some beautiful fish fillets. The wild salmon looked too good to pass up. At $22 for 2 lbs of fish, I felt like we were getting a pretty good deal. Our fish guy informed us these beauties were from British Columbia. Not exactly local, but better than farmed, and still on the west coast.


I had some wonderfully fragrant cilantro and some limes, so I decided to mix up a cilantro lime sauce to serve with our fish. Take two handfuls of cilantro, three cloves of garlic, the juice of two limes, and add just enough olive oil to emulsify in the food processor.

To cook the salmon fillets (I used 8 oz pieces), heat a pan over medium to medium high heat. Place 2 tbsp oil to coat the pan. When the oil shimmers, place the fillets in the pan, skin-side up cooking for 4-5 minutes. Flip and add the cilantro lime sauce on top. Cook for three minutes. There will still be pink in the middle. To finish cooking through, place in a 325 degree oven for 5-10 minutes.

The flesh was buttery and sweet. The cilantro lime added bright fresh flavors that worked well with the supple flesh. Serve with steamed asparagus and rice, and some lemon wedges. Bon Appetite!

Tuesday, May 5, 2009

Bagel Baking at Home?!


Whole-wheat Everything Bagels

AJ recently sent me an interesting article he found in Slate magazine discussing the cost-effectiveness of making things at home versus buying them in the store. I am all about homemade items, which can be attributed to my spoiled childhood, where my mother would never think of baking brownies from a box. However, there are some things I would never dream of making on my own - cream cheese, yogurt, and bagels. All of these items are investigated in the article. All of these require more effort than driving to your local grocery store, but some are deemed worthwhile, while others failed to impress. The author's bagel making experience, however, was one of the best. Her claims about the great taste and the cost-effectiveness of the home-made bagel inspired me to try it out. Click here for the recipe.


Little balls of dough, just waiting for holes to be punched!

The recipe, from start to finish, ended up taking about 2.5 hours. The dough came together rather easily - water, sugar, yeast, flour. A little kneading and I was ready to let my big ball of dough rise. After an hour, I divided the dough into ten little balls. These are poked in the middle, creating holes. The bagels are then allowed to rise another ten minutes.


Not as pretty as the ones in the store, but not too bad for my first try!


Steamy water bath.

After the second rise, I placed the bagels in a sugary water bath. The water bath gelatinizes the starches, giving the bagels their chewy crust. I used a small pot, so I only put in two at a time. As you can see, my shaping of the dough wasn't completely uniform, so little cracks appeared as they boiled in the water. However, I don't think that affected the baking process. Once the bagels have dried on a towel, you can place them on a greased baking sheet.


Garlic, poppyseeds, onion, and sesame seeds top them off.

I followed the directions with the eggwash and added poppy seeds, sesame seeds, garlic and onion. Whole wheat everything bagels are my favorite. I would def recommend using a brush for the egg wash, my attempt at using a paper towel was flawed. I may have put a little too much egg on top of the bagels. Up until the baking process I would say everything went very well. I baked the bagels according to direction. I believe I misinterpreted the directions, because my bagels came out overcooked. The bagels were extremely brown. I should have turned them over halfway through, but I misread and thought I should turn them over after 25 minutes. Well it was too late at that point.

AJ and I still ate two bagels each, but I was disappointed with the overall results. Another concern was the consistency of the dough on the inside. It almost seemed like it could use a couple more minutes in the oven. I think I would reduce the temp of the oven to 325 and experiment with the baking time. Let me know if you try these out, or if you have a better bagel recipe!